![Your system requires SMB2 or higher [TECHNICIAN FIX]](https://friend-of-friends.com/storage/img/images_1/your-system-requires-smb2-or-higher-[technician-fix].jpg)
Many Windows 10 users reported Your system requires SMB2 or higher error message on their PC. In case you're not familiar, SMB stands for Server Message Block, and it's a protocol for sharing files. The protocol has two versions, the SMB1, and the SMB2, and while both can be used, the latter is the more secure one.
SMB1 protocol is vulnerable and your system will give you a warning message saying that it requires SMB2. This can be an annoying issue, but it can be fixed in a matter of minutes with our solutions, so let's get started.
How to enable SMB2 on Windows 10?
1. Check if your system can install SMB2
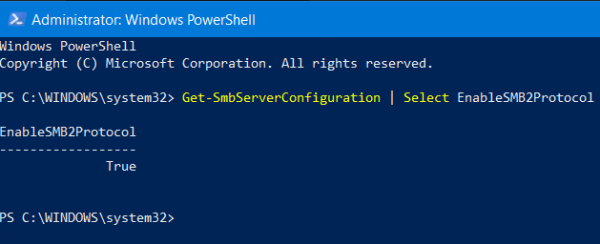
- Start PowerShell as administrator. Press the Windows Key+ X and select PowerShell (Admin).
- Type Get-SmbServerConfiguration | Select EnableSMB2Protocol in the command prompt of the Window PowerShell and press Enter.
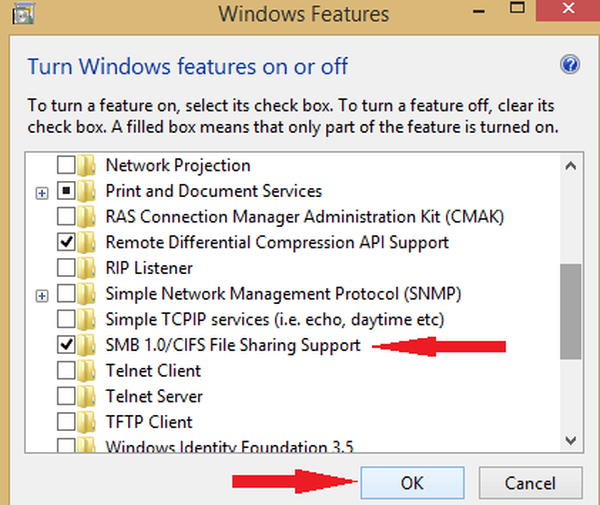
- If your system can run SMB2 protocol, type windows features in the Search box and select Turn Windows features on or off.
- Once the Windows Features window opens, check SMB1/CIFS File Sharing Support option and hit OK.
- Restart your PC and check if the problem with SMB2 is resolved.
What is PowerShell and how to use it? Read our in-depth guide to find out!
2. Use Powershell
- Start PowerShell as administrator. We already showed you how to do that in our previous solution.
- Enter Set-SmbServerConfiguration -EnableSMB2Protocol $true and press Enter.
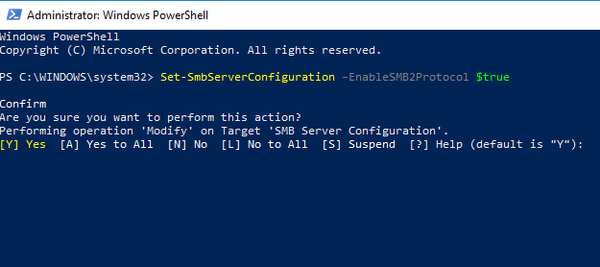
- Press Y to confirm.
There you go, two simple solutions that can help you fix Your system requires SMB2 or higher error. Be sure to try all of our solutions and let us know in the comments section if you found our solutions helpful.
RELATED STORIES TO CHECK OUT:
- This is how you can fix Windows 10 ODBC issues
- Fix Unable to access Samba share message with these solutions
- Disable SMBv1 on Windows using these quick methods
- windows 10 fix


